The Pastime Projects (www.pastimeprojects.com) web site contains warnings about copyright
terms and conditions. This may frighten away those experimenters who are inspired by the
vintage makeup of our kits. That is the last thing we want to do! Please email us at
pastimeprojects(at)yahoo(dot)com for permission to copy or request copies of our materials.
We are “Makers” “do it yourselfers” handy men, or what ever you call yourself!
Let us hear from you! How can we help you?
Archive for the ‘vintage radio kits’ Category
Pastime Projects rights to copy
July 10, 2018Tuning the HF Transmitter the Easy Way
January 24, 2018I recently saw where a new ham operator was questioning how one tunes a HF transmitter that does not have a built in meter in the output circuit. He was referring to the Pastime Projects 6V6 transmitter kits but the question would apply to similar low to medium power transmitters.
One easy and cheap way is to use a CB Field strength /SWR/power meter. If you check the specifications, you will find these meters will work just fine on all HF frequencies from 160 to 10 meters and beyond. Many are listed at safe power ratings of 10 to 1000 watts of output power. And, they sell for $30.00 or less (much less) on eBay! Ideal for experimenting and measuring our HF transmitter kits performance with almost lab rating results for low surplus prices.
Simplest way to use the meter is as a field strength meter. The meter will have a hole for a short wire antenna to attach. (Make sure the wire antenna you use has some kind of top on it to prevent injury to an eye!) With the meter near your transmitter – but not electrically attached – try transmitting into an antenna and tune your FSM for maximum strength. The meter follows the strength of the transmitter, so tuning for maximum should get you great results.
Good luck! Always get help from your local club when you can. A good experienced radio amateur is always a friend to have. 73 Glenn .. for Pastime Projects.
pastimeprojects(at)yahoo(dot)com or http://www.pastimeprojects.com
Pastime Projects Releases 1940’s Style “Companion” Power Supply
March 21, 2017
SAMSUNG CAMERA PICTURES
Pastime projects http://www.pastimeprojects.com has started production of the ‘Slat Board’ Style Power Supply that closely resembles the original style of the companion power supply shown in the ARRL Handbooks for use with the 6V6
‘Slat Board’ novice transmitter for 80 and 40 meter CW. This model uses a vacuum tube as a rectifier instead of the solid state diodes used in the other power supply available. Either model has been tested and performs very well.
Full specifications will be available on the web page. Or contact pastimeprojects(at)yahoo(dot)com for more info.
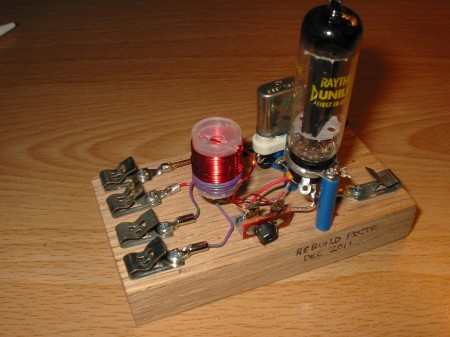
Pastime Projects “Remember When” 6V6 Transmitter Kit 40 Meter Special
February 27, 2017PASTIME PROJECTS
“REMEMBER WHEN” 6V6 TRANSMITTER KIT
40 Meter Special Edition
Thanks to the suggestion of one of our overseas amateur radio builders, this kit has been packaged as a 40 meter Special Edition. The trend of 40 meter operation using low power cw is growing in popularity. This kit includes the three coils, plate, antenna link, and cathode coil, pre wound and packaged with the kit.
In exchange for the labor and cost to include these prefinished coils, the common 8 penny nails used for coil winding have been excluded from the kit. Also, the extra wire for winding the 80 meter coils is not included.
The coil winding form layout and winding information are, of course, still part of the provided manual. Our design includes Amish prepared oak strips and end pieces, brass screws, “sucker sticks”, and other hardware just like the original. Many of the components are new (and we think more reliable than originals) but the retro look remains.
This kit will operate on 40 meter or 80 meter CW ham radio frequencies with power out in the 2 to 5 watt (or more) range. It is crystal controlled. Change from one band to the other requires different coils be soldered in. The 40 meter version seems most popular among our builders.. The manual that comes with this kit contains step by step instructions for assembly, wiring, and soldering. The vacuum tube is included. The builder will need a crystal and power supply.
To put this kit on the air a license, antenna, and power supply will be required. The builder should be familiar with working around high voltage before applying power to this kit.
NO CHANGE IN PRICE AND SAVE A LITTLE ON SHIPPING COSTS
!
See http://www.pastimeprojects.com for more information or contact us at pastimeprojects@yahoo.com
Pastime Projects shipments out of United States
January 14, 2017
Prototype Receiver
WE ARE SEEING DAILY ACTIVITY ON OUR WEB SITE OF POTENTIAL BUYERS WHO ARE LOCATED OUTSIDE THE UNITED STATES. WHILE WE DO NOT HAVE ACCESS TO ANY PERSONAL INFORMATION, THE COUNTRIES OF ORIGIN ARE LISTED. I WOULD LIKE TO ENCOURAGE YOU TO INQUIRE ABOUT YOUR INTERESTS IN OUR PRODUCTS. WE WILL HELP YOU THROUGH THE PURCHASING PROCEDURES.
IF PURCHASING PASTIME PROJECTS ITEMS FROM YOUR ADDRESS OUTSIDE THE UNITED STATES SIMPLY EMAIL US AT pastimeprojects(at)yahoo(dot)com AND LET US GUIDE YOU THROUGH THE STEPS. ONE EASY WAY IS TO SIMPLY ENTER YOUR ORDER THROUGH THE PAYPAL BUTTONS. WHEN WE RECEIVE YOUR PAYMENT WE WILL CALCULATE THE ADDED POSTAGE AND SEND YOU AN INVOICE FOR THE ADDITIONAL PAYMENT.
WE WILL COMMUNICATE THROUGH EMAILS THROUGH THE ENTIRE PROCESS.
Pastime Projects Regenerative Receiver Kit Redesign Coming
December 2, 2016
The regenerative receiver kit is returning to the http://www.pastimeprojects.com catalogue of radio enthusiasts kits.
The design was redeveloped around the 40 meter ham band range. It receives AM foreign broadcast, cw, single side band with patience, and radio amateur AM stations. It is not recommended for use as a main receiver for radio amateur stations. Regen receivers tend to require careful tuning. They show more drift than commercial receivers.
But they are fun for beginners, short wave listeners, and experimenters. Our design now has been tested on the
3.5 MHz range, and 80 meter ham bands are being heard. The kit includes some unusual features. One is the use of
a “space charge” type tube that uses 12 volts on the plate as well as the filament. That means this receiver will be powered by your 12 volt DC power supply. The kit is somewhat difficult, but assembly, wiring,, and testing are explained in detail in the step by step manual that is included in the kit. Stay tuned for more! 73 Glenn for Pastime Projects (at) yahoo (dot) com.
SPECIAL DEAL ON 6V6 MC 80 M PASTIME PROJECTS TRANSMITTER KIT
August 9, 2016Today we are offering a special on our pastime projects 6V6 MC 80 Kit. This kit includes a wound and tested
Output plug in coil tested on 80 meters in our shop. In addition, we will include a new 3.5795 crystal element assembled in a FT-243 or similar style vintage type crystal holder. These are assembled and tested here, both
on a communications monitor and in a completed 6V6MC 80 Kit. These crystals are performing well for us in the
lab here at Pastime Projects, especially using our QRP mode power supply at 200 volts. The crystals have been
tested at 350 VDC with good results, but we are not ready to warranty the crystals at this time. For a limited
time we will also offer free shipping within the US. Delivery may run a little longer depending on demand,
but we are starting to build stock in advance of orders. 73 best wishes Glenn Brown for http://www.pastimeprojects.com and pastimeprojects(at)yahoo(dot)com.
How to Paint an aluminum chassis at home – the Pastime Projects Way
August 3, 2016I have an aluminum chassis with some scratches on the surface. The usual methods of preparing the surface include sanding, etching, several methods of cleaning and final preparation of the surface using caustic materials and/or
primers and so on.
I liked the old timer radio chassis look of the 1940’s and 1950’s with the crinkled black finish. I also like the
“Radio Kit” approach of the 1960’s where the look went to cool “crinkle finish” variations in green-blue
shades of color.
For preparation I washed the chassis with warm soap and water, then wiped it dry with a very soft “bar towel”.
I made cardboard cutouts the size of the vacuum tube flanges. I purchased some double-sided tape and covered one
side of the cardboard cutouts with this tape. After trim, I located these on the metal chassis. Most of the other holes on the chassis were covered with AVERY #6733 “Color Coding Labels”. I have seen these used for pricing things at garage sales.
Many stores carry the “Rust-Oleum” Brand of spray paints. I found Rust-Oleum “Multicolored

SAMSUNG CAMERA PICTURES
results. Just be sure you spray outdoors and away from fires and flames.
This chassis prep progress will continue. Watch for future blogs.
Just remember, I am no expert, and simple share my ideas with you. This takes time, and would appreciate it if
you share with friends, just include a little note this was first seen on Pastime Projects R3tr0rad’s Blog page,
written by Glenn Brown in August 2016. Visit http://www.pastimeprojects.com and hit “Contact Us” or simply mail
pastimeprojects(at)yahoo(dot)com with your thoughts. 73 Glenn
12K5 OSCILLATOR KIT PRICE INCREASE
June 8, 2016After 10 years of production our little 40 meter do it yourself code practice oscillator kit faces a price increase. We recently looked at our costs in today’s market as compared to what we paid in 2006. The increase is effective immediately. You will still get the same pre-wound coil, a new qrp style crystal, and the detailed instruction manual we have strived to improve over the years. While this is considered a “transmitter” kit, we very
plainly describe its communication ability as “most likely won’t be heard next door”. You kit builders know that it’s still a thrill to follow instructions and build something yourself.
Happy Building! 73 Glenn for Pastime Projects pastimeprojects(at)yahoo(dot)com
Pastime Projects High Voltage Power Supplies
September 3, 2015 Pastime Projects (www.pastimeprojects.com) manufactures amateur radio kits. Two of our most favorite are the “Remember When” slat board 6V6 kit which was featured in the 1948 (and elsewhere) ARRL Amateur Radio Handbook. This simple transmitter used a 6V6 (or 6L6) vacuum tube on a chassis made of orange crate wood. It was designed for the amateur radio operator to send CW (code) on 80 or 40 meters.
Our more recent kit uses a metal chassis and an improved oscillator kit introduced in the 1960’s Handbooks. It was more stable, easier on crystals, and oscillated on 80, 40 and other bands by switching plug-in coils. Ours uses a 50 ohm link coupled output which matches today’s antennas, antenna tuners, low pass filters, and dummy loads.
These circuits, as first published, were often accompanied by a power supply design which used a 5 volt rectifier vacuum tube. We chose to use modern solid state silicon rectifiers instead. This eliminated the need for a 5 volt winding on the transformer, and the added heat, light, current demand, vacuum tube, tube socket and so
on associated with the rectifier tube.
The result is a simpler less costly power supply for you to build and enjoy. Best regards, Glenn Brown W8JZI for pastimeprojects.com
